Getting Started
Installation Guide
Overview
Indigo Virtual Switch (IVS) is a pure OpenFlow virtual switch designed for high performance and minimal administration. It is built on the Indigo platform, which provides a common core for many physical and virtual switches.
Prerequisites
Ubuntu 11.10
sudo apt-get install libnl3-dev pkg-config python-tz libpcap-dev openvswitch-datapath-dkms
Ubuntu 12.04
sudo apt-get install libnl-3-dev libnl-genl-3-dev libnl-route-3-dev pkg-config python-tz libpcap-dev openvswitch-datapath-dkms
Get the Code
Download most recent release 0.3
curl https://github.com/floodlight/ivs/archive/branch-0.3.zip > ivs-0.3.zip
unzip ivs-0.3.zip
Download nightly (unstable)
curl https://github.com/floodlight/ivs/archive/master.zip > ivs-unstable.zip
unzip ivs-unstable.zip
Build and Install
cd ivs
make
The IVS daemon and ivs-ctl utility will be written to
targets/ivs/build/gcc-local/bin/ivs
targets/ivs-ctl/build/gcc-local/bin/ivs-ctl
Copy it to the sbin directory
sudo cp targets/ivs/build/gcc-local/bin/ivs targets/ivs-ctl/build/gcc-local/bin/ivs-ctl /usr/sbin
Running IVS
Controller configuration
You'll need an OpenFlow controller to use IVS. We suggest Floodlight, which should work out of the box. Follow your controller's instructions to get it running and note down its IP address.
Kernel Module
The openvswitch kernel module must be loaded:
modprobe openvswitch
Run the IVS daemon
You'll need to tell it the IP address of the controller (-c) and the initial set of network interfaces to connect (-i). Here's an example command line:
sudo ivs -c 192.168.1.10 -i eth1 -i eth2
IVS will immediately begin communicating with the controller and, depending on your controller's configuration, forwarding traffic between eth1 and eth2.
ivs-ctl add-port
and
ivs-ctl del-port
can be used to add and remove ports at runtime (for example, this is used by hypervisors when a VM is started). See the ivs-ctl reference for more more details.
Using IVS with libvirt (KVM)
Prerequisites
Follow the instructions at the IVS Installation Guide to get IVS installed and running.
Installation
Install the packages required for kvm
sudo apt-get install kvm libvirt-bin virtinst
Remove the bridge created by libvirt
(Do this step only if you are exclusively using xenon for your virtual network topology on this host.)
sudo virsh net-destroy default; sudo virsh net-autostart \--disable default
Create the following script (call it "/etc/ivs-ifup") which adds the TAP interface to the xenon switch when machines are started
#!/bin/sh
/sbin/ifconfig $1 0.0.0.0 up
/usr/sbin/xenon-ctl add-port indigo $1
Make the configuration scripts executable
sudo chmod+x /etc/ivs-ifup
Add the following configuration snippet to the bottom of "/etc/apparmor.d/abstractions/libvirt-qemu" to configure apparmor to allow the necessary network configuration changes when virtual machines are started/stopped.
/etc/apparmor.d/abstractions/libvirt-qemu
# needed to make network changes
capability net_admin,

#network configuration scripts/binaries
/usr/sbin/ivs-ctl rmix,
/sbin/ifconfig rmix,
/etc/ivs-ifup rmix,
Reload apparmor to apply the configuration changes.
sudo /etc/init.d/apparmor reload
Add the following configuration snippet to the bottom of /etc/libvirt/qemu.conf to allow libvirt to make networking changes.
user = "root"
group = "root"

cgroup_device_acl = [
    "/dev/null", "/dev/full", "/dev/zero",
    "/dev/random", "/dev/urandom",
    "/dev/ptmx", "/dev/kvm", "/dev/kqemu",
    "/dev/rtc", "/dev/hpet","/dev/net/tun",
]
Restart libvirt-bin to apply the changes
sudo /etc/init.d/libvirt-bin restart
Configure any virtual machines with the following interface statement under <devices> to attach them to the IVS switch.
sudo virsh edit <vmname>
<interface type='ethernet'>
  <script path='/etc/ivs-ifup'/>
</interface>
Here is a full sample of an XML configuration for a VM running on a IVS switch.
<domain type='kvm'>
  <name>newvm2</name>
  <uuid>cd4e4b03-487d-6583-0b95-d4a41cc2503b</uuid>
  <memory>262144</memory>
  <currentMemory>262144</currentMemory>
  <vcpu>1</vcpu>
  <os>
    <type arch='x86_64' machine='pc-1.0'>hvm</type>
    <boot dev='hd'/>
  </os>
  <features>
    <acpi/>
  </features>
  <clock offset='utc'/>
  <on_poweroff>destroy</on_poweroff>
  <on_reboot>restart</on_reboot>
  <on_crash>destroy</on_crash>
  <devices>
    <emulator>/usr/bin/kvm</emulator>
    <disk type='file' device='disk'>
      <driver name='qemu' type='qcow2'/>
      <source file='/home/administrator/newvm2/tmpRVK6eg.qcow2'/>
      <target dev='hda' bus='ide'/>
      <address type='drive' controller='0' bus='0' unit='0'/>
    </disk>
    <controller type='ide' index='0'>
      <address type='pci' domain='0x0000' bus='0x00' slot='0x01' function='0x1'/>
    </controller>
    <interface type='ethernet'>
      <mac address='52:54:00:d6:48:b1'/>
      <script path='/etc/ivs-ifup'/>
      <address type='pci' domain='0x0000' bus='0x00' slot='0x03' function='0x0'/>
    </interface>
    <input type='mouse' bus='ps2'/>
    <graphics type='vnc' port='-1' autoport='yes' listen='127.0.0.1'>
      <listen type='address' address='127.0.0.1'/>
    </graphics>
    <video>
      <model type='cirrus' vram='9216' heads='1'/>
      <address type='pci' domain='0x0000' bus='0x00' slot='0x02' function='0x0'/>
    </video>
    <memballoon model='virtio'>
      <address type='pci' domain='0x0000' bus='0x00' slot='0x04' function='0x0'/>
    </memballoon>
  </devices>
</domain>
After starting your virtual machines, you should be able to see the tap interfaces connected to the switch with ivs-ctl show.
~$ ivs-ctl show
indigo:
  kernel lookups: hit=0 missed=390 lost=12
  kernel flows=0
  ports:
    0 indigo (internal)
      rx: packets=12 bytes=720 errors=0 dropped=0
      tx: packets=0 bytes=0 errors=0 dropped=0
    1 tap0
      rx: packets=35 bytes=4213 errors=0 dropped=0
      tx: packets=35 bytes=4402 errors=0 dropped=0
    2 tap1
      rx: packets=35 bytes=4402 errors=0 dropped=0
      tx: packets=35 bytes=4213 errors=0 dropped=0
    1023 gre (gre)
      rx: packets=0 bytes=0 errors=0 dropped=0
      tx: packets=0 bytes=0 errors=0 dropped=362
Installation with Virtual Box
Prerequisites
Follow the instructions at the IVS Installation Guide to get IVS installed and running.
Installation
Install the packages required for virtualbox
sudo apt-get install virtualbox-4.2
Create a TAP interface for each virtual machine that will be running on the host. The following command creates 8 interfaces numbered veth0 to veth7.
for tap in `seq 0 7`; do sudo ip tuntap add mode tap veth$tap; sudo ip link set veth$tap up; done
Edit /etc/rc.local to automatically create the TAP interfaces at startup.
#!/bin/sh -e
#
# rc.local
#
# This script is executed at the end of each multiuser runlevel.
# Make sure that the script will "exit 0" on success or any other
# value on error.
#
# In order to enable or disable this script just change the execution
# bits.
#
# By default this script does nothing.
for tap in `seq 0 7`; do sudo ip tuntap add mode tap veth$tap; sudo ip link set veth$tap up; done
/etc/init.d/xenon restart
exit 0
Modify the IVS configuration file /etc/default/ivs to include the virtual interfaces.
# Default to connecting to a local OpenFlow controller
DAEMON_ARGS="-c 127.0.0.1:6633 -i veth0 -i veth1 -i veth2 -i veth3 -i veth4 -i veth5 -i veth6 -i veth7"
Restart xenon to apply the changes
sudo restart xenon
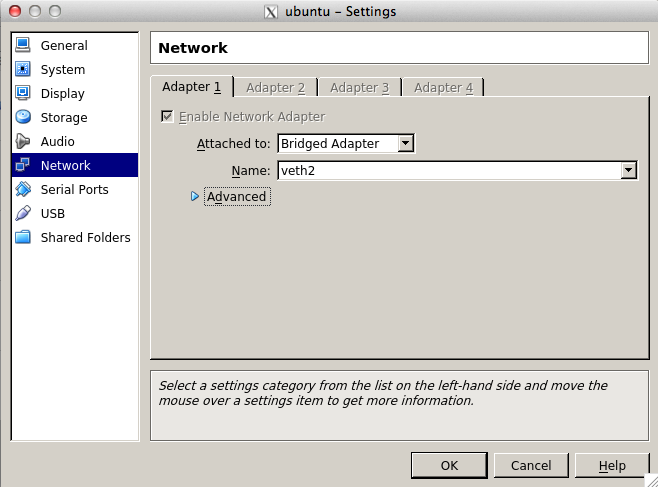
To connect a virtual machine to the Xenon switch, go to the network configuration under Machine->Settings->Network, select Bridged Adapter, and then choose one of the veth interfaces.
Alternatively, the VboxManage tool can be used to edit the network configuration from the command-line.
VBoxManage modifyvm <vmname> --nic1 bridged --bridgeadapter1 <interface_to_bridge_to>
The hosts should now be able to communicate via the Xenon switch. xenon-ctl show should show traffic counters increasing on the bridged interfaces.
~$ xenon-ctl show
indigo:
  kernel lookups: hit=348 missed=444 lost=0
  kernel flows=0
  ports:
    0 indigo (internal)
      rx: packets=0 bytes=0 errors=0 dropped=0
      tx: packets=0 bytes=0 errors=0 dropped=0
    1 veth0
      rx: packets=0 bytes=0 errors=0 dropped=0
      tx: packets=420 bytes=25632 errors=0 dropped=0
    2 veth1
      rx: packets=0 bytes=0 errors=0 dropped=0
      tx: packets=420 bytes=25632 errors=0 dropped=0
    3 veth2
      rx: packets=531 bytes=38992 errors=0 dropped=0
      tx: packets=261 bytes=22944 errors=0 dropped=0
    4 veth3
      rx: packets=261 bytes=22944 errors=0 dropped=0
      tx: packets=531 bytes=38992 errors=0 dropped=0
    5 veth4
      rx: packets=0 bytes=0 errors=0 dropped=0
      tx: packets=420 bytes=25632 errors=0 dropped=0
    6 veth5
      rx: packets=0 bytes=0 errors=0 dropped=0
      tx: packets=420 bytes=25632 errors=0 dropped=0
    7 veth6
      rx: packets=0 bytes=0 errors=0 dropped=0
      tx: packets=420 bytes=25632 errors=0 dropped=0
    8 veth7
      rx: packets=0 bytes=0 errors=0 dropped=0
      tx: packets=420 bytes=25632 errors=0 dropped=0
    1023 gre (gre)
      rx: packets=0 bytes=0 errors=0 dropped=0
      tx: packets=0 bytes=0 errors=0 dropped=420