How to Perform Transparent Packet Redirection with OpenFlow and Floodlight
This tutorial is for Floodlight v1.0, v1.1, v1.2, and later. Prior Floodlight versions have a different REST API.
Also, this tutorial is geared towards the GENI testbed. Although instructions are not provided, it can easily be conducted using mininet or your own network.
This tutorial was designed, written, and contributed by Geddings Barrineau (cbarrin). Thanks Geddings!
Table of Contents
Motivation
Are you interested in Software Defined Networking or OpenFlow? Don't know where or how to start? Or maybe you just haven't been able to think of any good ideas?
If any of these questions describe you then you're in the right place!
As the title suggests, in this tutorial you're going to learn how to use Floodlight in conjunction with Open vSwitch and OpenFlow to perform transparent redirection of packets! If a lot of that sounds confusing, don't worry – we'll go over everything in detail and show you step by step every command that you're going to need to run.
By the end of this tutorial you should be familiar with the following:
- Floodlight
- Open vSwitch
- Creating OpenFlow flows
- OpenFlow matches
- OpenFlow rewrites
- Various Linux networking tools
If this sounds good to you, then let's get started!
Getting our GENI topology set up
To get things moving quickly, an rspec of the topology you’ll be using has already been created for you. You can download that here.
Simply point Jacks to that file and watch as your topology is magically created!
The only thing left to do is to choose a site, but wait for further instructions before you do that.
In the meantime, get a little familiar with the topology. You’ll notice that there are three hosts, all connected to each other through a single OpenFlow enabled switch in the middle (more on that in a second). This is your data plane.
The next thing you should notice is that the switch is connected to the controller. This is your control plane.
More about the switch. It is actually a software switch known as Open vSwitch or OVS for short. The OVS used here is version 2.3.1 which (almost) fully supports OpenFlow 1.3.
And about the controller. In this tutorial we’ll be using the Floodlight controller. It’s just a Java based controller, and it’s going to have a global view of our network! That means it will know all about the switch and all the hosts connected to it. Floodlight is going to make every decision on how packets should travel through the data plane. In fact, we’ll be telling Floodlight how it should handle certain packets by making it insert some well crafted flows onto our software switch.
Configuring the controller
Once a site has been chosen and all of the resources are up, go ahead and ssh into the controller. All of the commands in this section are going to be run from within the controller resource.
There are a few things that we need to install, the first being Floodlight! It’s located on GitHub, so we’ll just grab that using the following command:
git clone http://github.com/floodlight/floodlight
Since Floodlight was recently updated to support Java 8 (lambda expressions anyone?) we need to download and install Java 8 onto this machine. In order to do this we’re going to have to add a repository, which requires us to install another tool.
I know. I hate it too.
Go ahead and enter these commands:
sudo apt-get update
sudo apt-get install software-properties-common python-software-properties
sudo add-apt-repository ppa:webupd8team/java
sudo apt-get update
sudo apt-get install oracle-java8-installer
Congratulations! You just installed Java 8! Confirm it with the following command:
java -version
Because Java is a compiled language, we’re also going to need to compile the controller. We’re going to do this with the tool ant.
Let’s go ahead and install that:
sudo apt-get install ant
And finally (this is the last one I promise) we need to install curl. Curl is simply a tool that lets a user transfer data to or from a server. Floodlight has, built in, what’s known as a REST API. Using Curl and these REST commands, we can communicate with Floodlight, which we will do extensively.
Seriously, this is the last one. Go ahead and install:
sudo apt-get install curl
Okay! On to the fun stuff. Let’s change directories into the floodlight folder, compile, and finally run it.
Go ahead and run these commands:
cd floodlight
ant
java -jar target/floodlight.jar
You should now see a stdout log from Floodlight. Nothing too interesting yet, but if you wait long enough, you’ll see Floodlight sending out LLDP packets, trying to discover the topology. It won’t see much yet, though, because no switches have been connected to Floodlight.
Configuring the switch
Now that the controller is configured and running, we need to configure the switch.
Let’s start this off by looking at what our current switch configuration looks like.
You can see this by running the following:
sudo ovs-vsctl show
At this point, nothing is configured so you shouldn’t really see anything meaningful. That’s about to change!
Adding the bridge
The first thing we have to add is a bridge. A bridge directs traffic to the appropriate interface based on MAC address. We’ll add ports to it in a minute.
We’re going to create a bridge named br0. You can add it using the following command:
sudo ovs-vsctl add-br br0
Adding the ports
Now this is the point where things get a little trickier, so read carefully!
Run the command ifconfig. You’re going to see 5 eth interfaces:
- The public interface
- This is most likely going to be eth0 and have an IP address of 172.17.*.*
- DO NOT CHANGE THIS! You will get kicked out of your ssh session and will have to restart to get back in!
- The control plane interface
- This is going to have an IP address of 192.168.1.1
- This is the interface that is connected to the Floodlight controller
- Three 10.10.*.* interfaces; One to each host
- These are the interfaces that we’ll be adding to the bridge as ports
- We’ll also be changing the IP address on each of these as well
Below, I’ve highlighted the three host interfaces on my switch and their IP addresses. NOTE: YOURS MAY NOT BE THE SAME
From here on out I’ll be using generic names of interfaces in the rest of the tutorial. For instance, I might use "ethA" or "ethB". You'll need to substitute those with your own 10.10.*.* interfaces.
So now that we know the names of our three 10.10.*.*, we can add them as ports to our bridge.
We’ll use the following commands:
sudo ovs-vsctl add-port br0 ethA
sudo ovs-vsctl add-port br0 ethB
sudo ovs-vsctl add-port br0 ethC
We’re also going to have to remove the IP addresses on our host interfaces, as we won’t be using them. Keep in mind that this is a Layer 2 switch.
You can remove the IP addresses on those interfaces using the following commands:
sudo ifconfig ethA 0
sudo ifconfig ethB 0
sudo ifconfig ethC 0
You’re almost there! Go ahead and checkout your bridge again using sudo ovs-vsctl show. Here’s a picture of mine:
Pointing to the controller
So your bridge is configured correctly, but it doesn’t know where the controller is. Let’s fix that.
We’re going to point our switch to our (running) controller using the following command:
sudo ovs-vsctl set-controller br0 tcp:192.168.1.2:6653
You should see your switch connect to the controller within the Floodlight log. Here's what my log looked like:
Pat yourself on the back because you’re done configuring your switch!
Sanity check! Does it work?
Go ahead and ssh into Host 1. We’re going to make sure we can communicate with everyone. This will be quick I promise!
On Host 1, go ahead and run the following:
ping 10.0.0.2
ping 10.0.0.3
Both of these should work. If they don’t then you’ll need to go back and see if you missed something or mistyped a command. Feel free to ask for help!
Boring traditional networking
So by this point you may have forgotten what this whole tutorial was about! Well fear not, I’m here to remind you.
Transparent redirection using OpenFlow.
Exciting stuff right? But first, let’s make sure we’re familiar with what’s going on without the redirection.
Go ahead and ssh into Host 2 and run the following command:
sudo tcpdump -i eth1 -eenn
Now ssh into Host 3 and run the same command:
sudo tcpdump -i eth1 -eenn
tcpdump is just a tool that lets us see what packets are showing up on a specified interface. The '-eenn' just tells it to give us more information and to not try to make out any of the names for the devices that it sees.
At this point you shouldn’t really see anything except for an occasional ARP or LLDP packet. That’s about to change.
On Host 1, go ahead and ping Host 2 using the following command:
ping 10.0.0.2
Now you should finally see some network traffic! Pay attention to where the packets are showing up. They should only be seen on Host 2, which makes sense because that’s who they’re addressed to!
With this in mind, it’s finally time to move on to the interesting stuff.
Crafting the static flows
You might be asking yourself right now, "What is a static flow?" A static flow is simply just an OpenFlow flow that’s inserted by Floodlight through the REST API. Basically, we create a JSON message to send to Floodlight telling it all about the flow we want it to insert. We'll tell it the switch to put the flow on, the name of our flow, the matches and the actions.
Remember that in OpenFlow, a flow is a pretty powerful tool and can do a lot of things. It can match on a lot of different fields and even rewrite those fields using actions!
You’re about to create and insert your own flows that will transparently redirect all IP packets from Host 1 (destined for Host 2) to Host 3. What do I mean by transparent? This is where it gets really cool... All of this redirection is happening without Host 1 knowing about it. This means that Host 1 still thinks it’s talking to Host 2 the whole time.
We’re going to need to create two flows, one for one direction and another for the other direction. We’ll go slowly through the first one and after that, going back should be pretty simple.
Flow 1: Host 1 to Host 3
To start, let me explain what exactly we're trying to accomplish with this first flow. You've already seen that when we ping Host 2 (10.0.0.2) from Host 1 (10.0.0.1) that Host 2 receives the packets. This makes sense though. Everything in that packet header is telling it to go to Host 2 – the MAC address, the IP address – which even tells Floodlight what port to send it out of!
BUT WE WANT TO SHAKE THINGS UP...
We want to redirect these packets away from Host 2 and towards Host 3.
So how do we do it? We're going to have to create a flow that will match on the IP packets destined to Host 2 from Host 1, and using actions, we're going to rewrite the MAC and IP addresses to trick Host 3 into thinking the packet was destined for it all along! We'll also need to tell our switch what port to send this packet out of.
I'm going to walk you through all the fields needed to create these flows and hopefully by the end of it, you'll feel comfortable creating flows that do all sorts of things!
Give it a switch
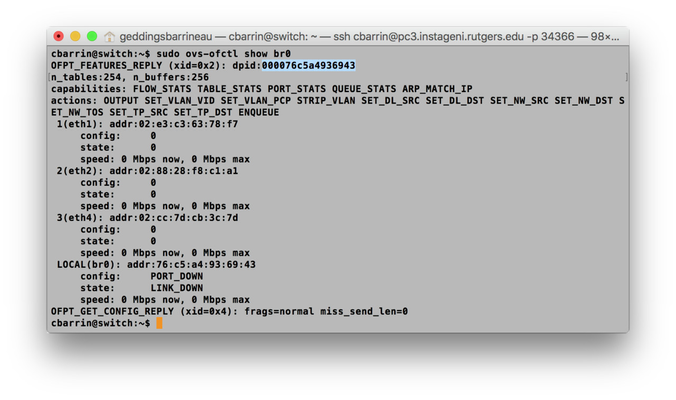
The first thing we need to do is tell Floodlight what switch we want to insert this flow on. We'll do this by entering the DatapathID (DPID) of our switch in the "switch" field in our JSON object that we're sending to Floodlight.
You can get this DPID by entering the following command on the switch node (assuming you named your bridge "br0"):
sudo ovs-ofctl show br0
I've show the output from my switch below. You'll notice I highlighted the DPID. YOURS WILL BE DIFFERENT! Keep track of this value. When we put it into the JSON object, you'll need to enter it in the format: 'xx:xx:xx:xx:xx:xx:xx:xx'
Give it a name
The next thing we need to do is give our flow a name. This name has to be globally unique! There cannot be another flow in your entire topology with the same name. We can just name this first flow 'flow-1'. We'll enter this value in the "name" field of our JSON object.
Is it important and is it active?
The next field we're going to need to set is the "priority" field. When a packet reaches a switch, it traverses every flow in order of priority until it matches on one of them. With this in mind, we want to give our flows a really high priority to make sure that they're always first in line! We'll use '32768' in our "priority" field.
This next one is pretty easy. You need to decide whether or not you want your flow to be active. (Hint: You probably do.) We'll just set the "active" field to "true". That will make sure our flow is actually doing it's job.
Match maker
Things get pretty interesting here. We're now going to define our matches or, in other words, what sort of packets we want to perform our actions on. It's good practice to be as specific here as possible, so that's what we'll do. We're going to go match by match here and explain what each field is matching on. I'll also show you how to find some of the values that you'll need.
The first thing we'll do is ask the controller what devices are connected. This will give us all of the information we need e.g. ports, MAC addresses, IP addresses.
Go ahead and run this command in a new tab on the controller resource:
curl http://localhost:8080/wm/device/ | python -m json.tool
In the output, you'll be given a list of devices that Floodlight has learned. You'll want to look for Host 1 and Host 2 (10.0.0.1 and 10.0.0.2). I've attached my output below. YOURS WILL BE DIFFERENT.
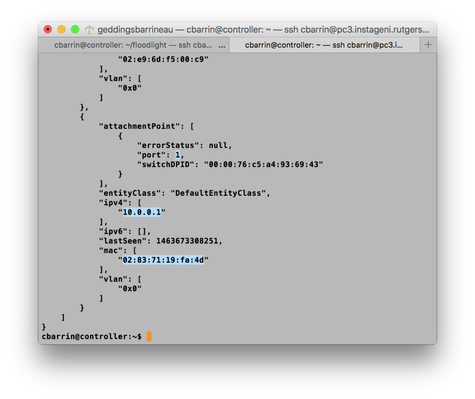
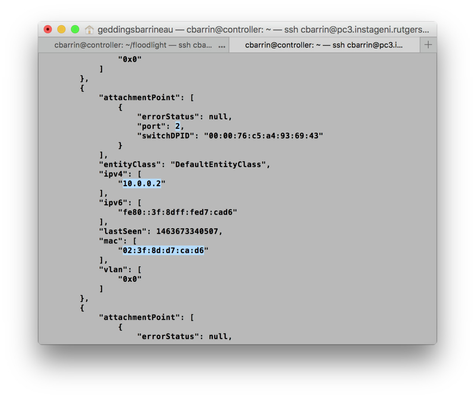
I've highlighted some important information that you'll need to keep track of. Now let's decide what matches we want to use.
First we'll match on the port that the packet comes in on. This field is called "in_port" and the value we'll use is the port number we just found for Host 1 (10.0.0.1).
Next we'll match on a specific EtherType, which in our case is IPv4. We'll do this by using the value '0x0800' for the field "eth_type".
Next we'll match on the source's MAC address and IP address. Our source is going to be Host 1 (10.0.0.1) so we'll enter Host 1's MAC address in the field "eth_src" and Host 1's IP address in the field "ipv4_src".
Finally we want to match on the destination's MAC address and IP address. Our destination is going to be Host 2 (10.0.0.2) so we'll enter Host 2's MAC address in the field "eth_dst" and Host 2's IP address in the field "ipv4_dst".
That's it for matches! Easy right? Now that we're matching on IPv4 packets from Host 1 to Host 2, let's create some actions to manipulate those packets...
Creating our actions
Remember that we're trying to redirect packets, from Host 1 destined for Host 2, to Host 3. To do that we're going to have to rewrite the destination addresses from Host 2's to Host 3's. We'll also need to specify which port the packets need to go out of. Make sense? Great!
Go ahead and find Host 3 (10.0.0.3) in that list of devices we just got from the controller. You should already know how to get Host 3's MAC address and IP address and it's port.
Unlike the matches, which are just individual entries, the actions are contained in a list called – you guessed it – "actions". I'll show you the full syntax in a second.
You'll just need to know that we'll rewrite the destination addresses using the fields "eth_dst" and "ipv4_dst". The values for these fields are going to be Host 3's MAC address and IP address, respectively.
To tell the packet which port to go out of, you'll use Host 3's port as the value for the field "output", which is always going to be the last entry in an actions list.
Putting it all together
Whew! That was a lot of work, but you're almost there! Let's put it all together now. This is the full command that you're going to enter on your controller resource. You'll need to fill in the fields that we talked about with the information that's going to be unique to your project. Note: don't keep the angled brackets <>.
curl -X POST -d '{"switch":"<DPID_OF_SWITCH>","name":"flow-1","priority":"32768","in_port":"<PORT_OF_10.0.0.1>","active":"true", "eth_type":"0x0800","eth_src":"<MAC_OF_10.0.0.1>", "eth_dst":"<MAC_OF_10.0.0.2>", "ipv4_src":"10.0.0.1", "ipv4_dst":"10.0.0.2", "actions":"set_field=eth_dst-><MAC_OF_10.0.0.3>,set_field=ipv4_dst->10.0.0.3,output=<PORT_OF_10.0.0.3>"}' http://localhost:8080/wm/staticflowpusher/json
After you insert this flow, you'll want to do a tcpdump on Host 2 and Host 3 using the following command:
sudo tcpdump -i eth1 -eenn
Then you'll want to ping Host 2 from Host 1 by running the following command on Host 1:
ping 10.0.0.2
If your flow was inserted correctly, you'll see all of your ping packets on Host 3, even though they were originally destined for Host 2!
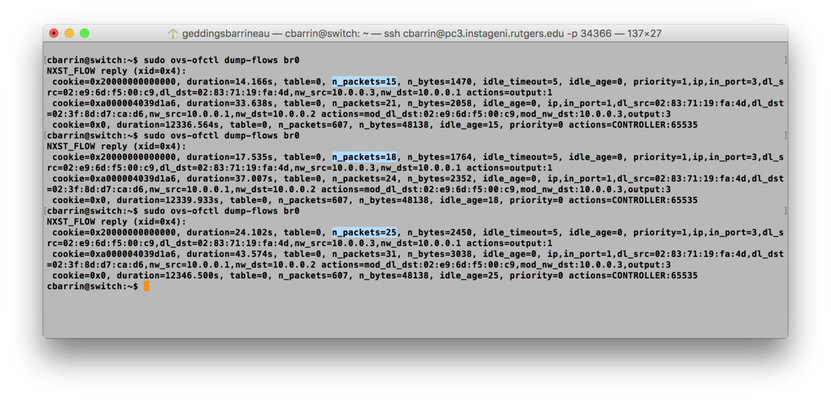
We can confirm that our flow is being matched on by running the following command on the switch resource:
sudo ovs-ofctl dump-flows br0
If you're still pinging, you can run this command a few times and actually watch the packet counter increase on the flow that you inserted! Here's what it should look like.
Go ahead and stop pinging for now.
Flow 2: Host 3 to Host 1
Going backwards?
So we created one flow to redirect packets to Host 3, but if you happen to ping from Host 1 to Host 2, you'll notice that Host 1 realizes that even though it is sending to Host 2, it is getting responses from Host 3. That isn't transparent! We don't want Host 1 to have any idea that it's not talking to Host 2. To make this work, we're also going to have to rewrite all the IP packets from Host 3 to Host 1, rewriting the source addresses to make it look like they're coming from Host 2. Make sense? This is essentially the same thing as our first flow, but in reverse.
By this point, you should have all of the information for Host 1, Host 2, and Host 3.
Building our second flow
We're going to build this flow a lot faster than the first so hang on!
The switch DPID is going to be the same as the first flow (we only have one switch), we'll give it the name 'flow-2', the priority will be '32768', and we'll set active to 'true'.
For our matches, we'll match on IPv4 packets (eth_type = 0x0800), our source is going to be Host 3 and our destination is Host 1. You'll need to fill in the MAC and IP address (eth_src, etc_dst, etc.) for Host 3 and Host 1. This also means that our "in_port" is going to be the port for Host 3.
For our actions, all we're going to do is rewrite the source from Host 3's address and port to Host 2's address and port. To do this you'll set the fields "eth_src", "ipv4_src", and "output" in your actions list.
That's it! This is going to be the command that you'll enter on your controller resource to insert the second flow. You'll need to fill in the fields that we just talked about with the information that's going to be unique to your project. Note: Don't keep the angled brackets <>.
curl -X POST -d '{"switch": "<DPID_OF_SWITCH>","name":"flow-2", "priority":"32768", "in_port":"<PORT_OF_10.0.0.3>", "active":"true", "eth_type":"0x0800", "eth_src":"<MAC_OF_10.0.0.3>", "eth_dst":"<MAC_OF_10.0.0.1>", "ipv4_src":"10.0.0.3", "ipv4_dst":"10.0.0.1", "actions":"set_field=eth_src-><MAC_OF_10.0.0.2>,set_field=ipv4_src->10.0.0.2,output=<PORT_OF_10.0.0.1>"}' http://localhost:8080/wm/staticflowpusher/json
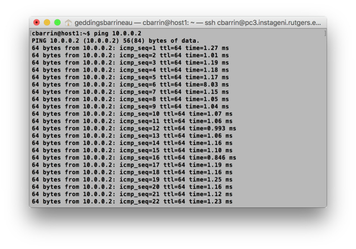
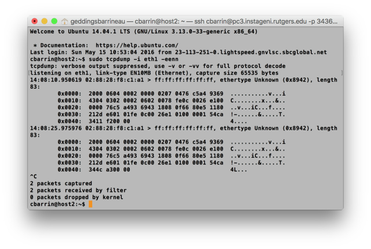
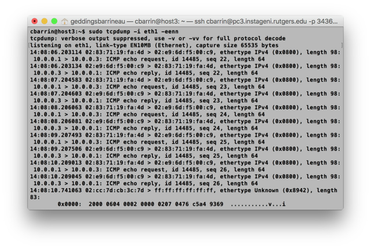
Go ahead and test it the same way that we tested the first flow. You'll want to run tcpdump on Host 2 and Host 3, and then, on Host 1, you'll want to ping Host 2 (10.0.0.2). You should see all the packets arriving on Host 3, but Host 1 thinks that it's talking to Host 2! Here's what is should look like. If you get this same output, then congratulations, you're finished!
Conclusion
You finished! It was a long trip, but hopefully you learned a lot. Let's recap a little bit and look at all you accomplished:
- Installed and configured Floodlight
- Configured OVS
- Took a look at traditional networking
- Crafted some awesome OpenFlow flows
- SHOOK THINGS UP (by transparently redirecting IPv4 traffic!)
I hope this simple tutorial has helped you start to see all the awesome possibilities that SDN and OpenFlow allow! We only used a couple actions and matches, but there are a ton of things that you can do with OpenFlow. If you want to see a pretty comprehensive list, there's one located in the Static Flow Pusher API page.