Reflashing a Pronto Switch
- Former user (Deleted)
- Former user (Deleted)

Goals
After completing the steps on this page, you should have copied a new Linux kernel or root file system into the on board flash of a Pronto Switch.
Important: It is highly recommended that you not change the on-board flash programming of the Pronto 3290, 3780 or other platform that includes a CF card. If you are having trouble booting the 3290, please follow the directions to copy a new image to the Compact Flash card at this page: Reflash the 3290 from the Backup Image
If you have overwritten the flash on a 3290 or 3780, and you have been able to download the files for burning the flash (see the main Indigo download page to see if these files are available) then you can follow the directions below to return the flash to its original state. This requires that you are still able to boot the switch to the u-boot prompt.
Prerequisites
You need the following to complete the setup.
- A Pronto Ethernet switch.
- A computer with software that can communicate via a serial port.
- A serial port cable to connect the switch and computer. See Serial Ports on Quanta and Pronto for more information.
- A computer (could be the same one as above) running a TFTP server (see the appendix on the page Up and Running on the 3290 or 3780
- A cable to connect the Pronto switch and the TFTP server. (Or connect them to a switch or network. The must be on the same subnet.)
- The Indigo firmware you want to load placed in the TFTP server directory.
- An IP address you can assign to the switch. It needs to be on the same subnet as your TFTP server.
The Setup
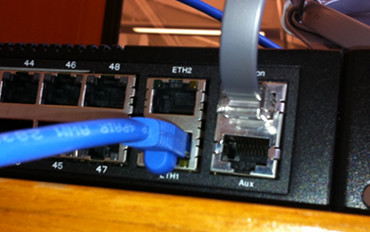
Once you've connected the serial port to the switch as shown on the page Serial Ports on Quanta and Pronto, connect the Ethernet port labeled ETH1 on the front panel of the switch to your TFTP server or network.
|
This shows the connection of the Ethernet and serial ports |
Boot and Connect
Connect to the serial port. In the screenshots below, I'm connected to a serial port server by telnet, but the content of the screens should look the same.
Power on the switch and wait a few seconds for the banner announcing u-boot to show up. It should give you a count down timer. Hit the space key within 5 seconds and you should get to the => prompt indicating you are talking to u-boot, the boot loader.
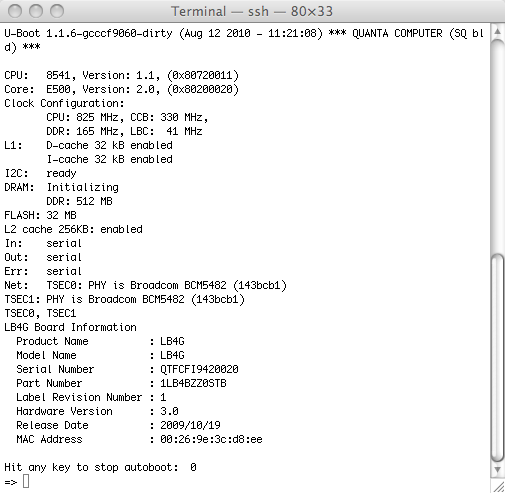
Your screen may look a little different if you are running on a 3290.
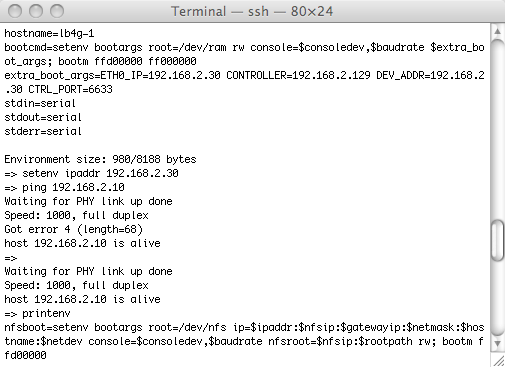
You can see the settings of variables at the boot prompt with the printenv command. The important variable for us right now is the IP address, ipaddr. If it is not set to an address on the subnet of the TFTP server, you must change it. In our example, we set it to 192.168.2.30 with the command
setenv ipaddr 192.168.2.30
After this we ping the TFTP server (192.168.2.10 in our example) to verify connectivity. Occassionally you may get an "error 4" message. As long as you see the message "host ... is alive" then things are okay.
Copy the Image
We again NOTE that it is not recommended to change the flash image on the 3290 or 3780. See the directions (TBD) to change the image on the CF card.
The following applies to the 3290 and 3780. For the 3240, this applies for releases starting with indigo-2011.03.31. Prior to that release, an older Linux kernel was used; for those releases, do not attempt to use the copy -d command.
We now use the copy command to copy the required files from the TFTP server.
IMPORTANT: You must use exactly the right flag depending on what file you are downloading. Failure to do so can leave your switch unusable. The flags are
Flag |
Meaning |
Usually Called |
Notes |
|---|---|---|---|
-k |
Linux kernel, |
uImage |
|
-r |
Root file system |
uInitrd2m |
|
-b |
Boot loader |
u-boot.bin |
Only change this if you're sure you need to |
-d |
Device description file |
LB9A.dtb |
Not on 3240; 3290 and 3780 only |
If you are upgrading a 3240 from pre-2011.03.31 to an image released on or after 2011.03.31, you must first update the U-Boot code. Otherwise, unless you received specific instructions indicating you need to update the U-Boot code, it is not recommended that you do this step.
Important In some cases, reflashing U-Boot may erase your boot loader environment variables. So make a copy of any custom variables you set up before continuing by recording the output of the 'printenv' command.
The command to reflash the U-Boot image is:
copy -b tftp://192.168.2.10/u-boot.bin
Make sure you reboot the system with the 'reset' command. Update your environment variables if they have changed.
reset
If you've already used the system with Indigo, you probably only need to upgrade the root file system with the command:
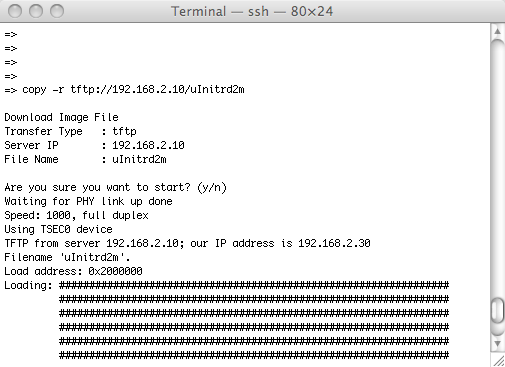
copy -r tftp://192.168.2.10/uInitrd2m
Remember use the IP address of your TFTP server in place of 192.168.2.10. Also, if the file name is different than uInitrd2m, use the filename as it is on the TFTP server.
You will see a prompt asking if you're sure. After you confirm, you should see a lot of # marks indicating that the file is loading. Occassionally you may see one T indicating a timeout. This is okay, as long as the # marks show up soon. If they don't try verifying that your TFTP setup is working correctly by accessing TFTP from another system on the network; then confirm that you can ping the TFTP server from the boot prompt. If it still doesn't work, double check that you're on the same subnet. (A ping will get routed, but TFTP won't).
You should get a "Bytes transferred" message, then the message "Erasing Flash" and then the message "Writing Flash". Once completed, you should see the => prompt again.
If necessary, repeat the process for the Linux kernel. In general, you can use the default kernel unless you have compiled new features in yourself or have received a custom kernel that indicates it should be copied into flash.
copy -k tftp://192.168.2.10/uImage
And, again if necessary, repeat the process for the Linux device tree. As with the kernel, unless you've created your own or have received a custom device tree that indicates it should be copied into flash, you should be fine with the one that comes with your system.
copy -d tftp://192.168.2.10/device-tree.dtb
The filename will vary depending on the platform, but it should have '.dtb' somewhere in it.
Boot the New Image
The LB4G/3240
Unless you've configured the switch to use NFS in the past, the switch is almost certainly set up to boot from flash by default. So you can type
boot
and the system should boot the new image. If you're not sure, type 'printenv' at the boot prompt. On a reset, the system will look for the variable 'bootcmd' and run the instructions it finds there. So you should an entry something like:
...
bootcmd=setenv bootargs root=/dev/ram rw console=$consoledev,$baudrate; bootm ffd00000 ff000000
...
The key thing is: 'bootm ffd00000 ff000000'. If you need to change this, you must be very careful about using proper quoting and putting the entire command on one line. (It's okay if the command is longer than one line, but don't hit the return key or use the \ key in the middle of the line.) To get the bootcmd above, you would type:
setenv bootcmd 'setenv bootargs root=/dev/ram rw console=$consoledev,$baudrate; bootm ffd00000 ff000000'
saveenv
After entering changes, make sure you type 'saveenv' to save your changes.
When you boot, you should get a banner indicating that the Linux kernel image and then the RAMdisk are being loaded:
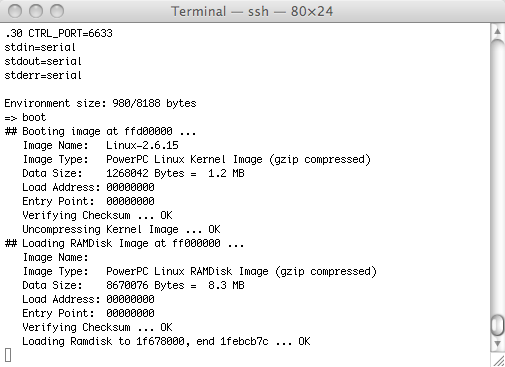
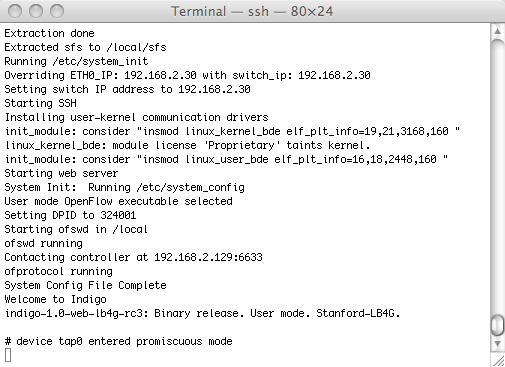
After about 15 seconds the new image will load and you should see a lot of information indicating the boot process is taking place. When complete, you should see the # prompt.
The 3290
By default, the 3290 will boot from the CF card. To override, this, there is normally a variable defined called flash_bootcmd. Run printenv and see if it's there:
...
flash_bootcmd=setenv bootargs root=/dev/ram console=ttyS0,$baudrate; bootm ffd00000 ff000000 ffee0000
...
If not, you can set it yourself. You must be very careful about using proper quoting and putting the entire command on one line. To get the variable defined as above, you would type:
setenv flash_bootcmd 'setenv bootargs root=/dev/ram console=ttyS0,$baudrate; bootm ffd00000 ff000000 ffee0000'
saveenv
Pay special attention to the placement of the single quotes ' ' and do not extend this across more than one line. (It's okay if the command is longer than one line, but don't hit the return key or use the \ key in the middle of the line.) After entering changes, make sure you type 'saveenv' to save your changes.
If you only want to boot from this once (as opposed to making the system always boot this image) you can now just type 'flash_bootcmd'. Otherwise, to make the system always boot from flash, you can change the variable 'bootcmd' as follows:
setenv bootcmd 'run flash_bootcmd'
saveenv
Setting the System Configuration
After booting to the Linux prompt, it may be easiest to use the CLI to set up the basic switch configuration. This describes these steps.
You need:
- The IP address of the Indigo switch as it will appear on the network
- The IP address and TCP port number you will use to connect to the controller
- The IP address of a router if the controller is not on the same subnet as the switch
- The dathpath ID to be assigned to the switch
- A name for the switch (optional)
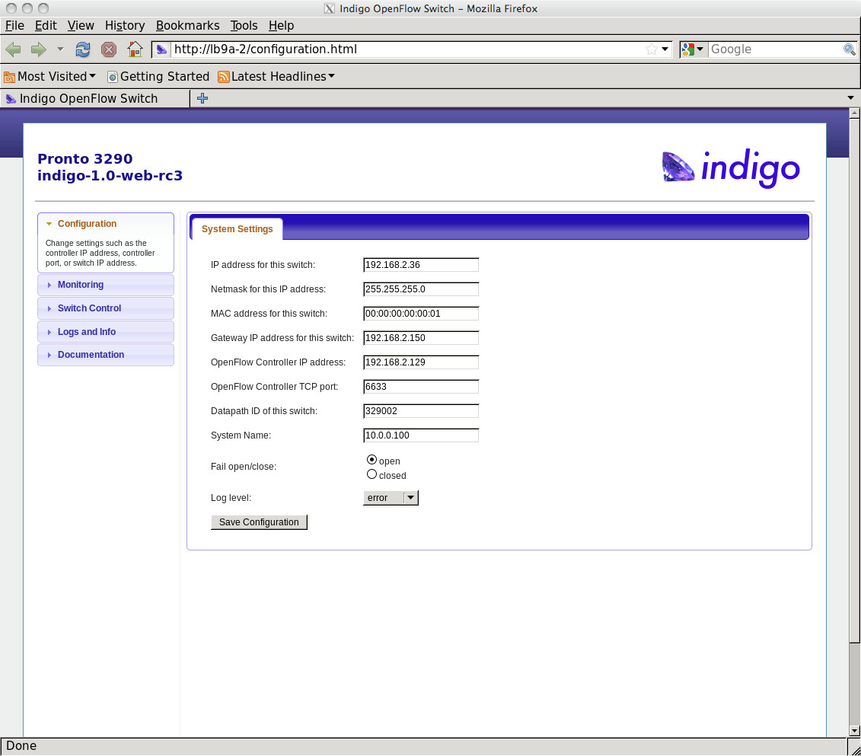
From the # prompt, start the CLI with the command 'cli'. You configure the core parameters with the CLI command 'config'. Here is a sample screen shot. In this example, we set the IP address of the switch to 192.168.2.36, the controller's IP to 192.168.2.129, the controller's TCP port to 6633, the datapath ID to 329002 (must be hex digits) and the gateway IP to 192.168.2.150.
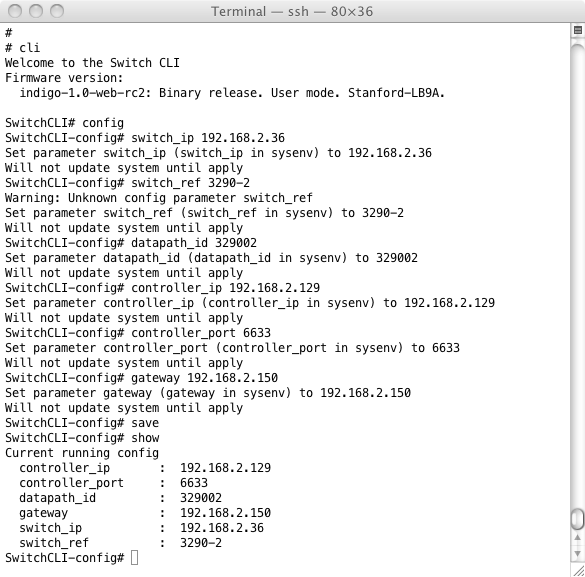
The key commands are:
# cli
SwitchCLI# config
SwitchCLI-config# switch_ip <switch-ip-address>
SwitchCLI-config# datapath_id <up to 12 hex digit DPID>
SwitchCLI-config# controller_ip <controller-ip-address>
SwitchCLI-config# controller_port <tcp-port number, usually 6633>
SwitchCLI-config# gateway <gateway-ip-address>
SwitchCLI-config# save
SwitchCLI-config# show
SwitchCLI-config# exit
SwitchCLI# exit
#
{toc}
You need to reboot the system for these changes to take effect.
Connect to the web UI
After configuring the IP address of the switch and rebooting, you can ssh, telnet (if enabled) or use a web browser to monitor and control the switch. To connect with a browser, type the IP address of the switch as 'http://<switch-ip-address>' You should see the Indigo settings page appear.